9.1 KiB
Recommended font: Meslo Nerd Font patched for Powerlevel10k
Gorgeous monospace font designed by Jim Lyles for Bitstream, customized by the same for Apple, further customized by André Berg, and finally patched by yours truly with customized scripts originally developed by Ryan L McIntyre of Nerd Fonts. Contains all glyphs and symbols that Powerlevel10k may need. Battle-tested in dozens of different terminals on all major operating systems.
FAQ: How was the recommended font created?
Automatic font installation
If you are using iTerm2 or Termux, p10k configure can install the recommended font for you.
Simply answer Yes when asked whether to install Meslo Nerd Font.
If you are using a different terminal, proceed with manual font installation. 👇
Manual font installation
- Download these four ttf files:
- Double-click on each file and click "Install". This will make
MesloLGS NFfont available to all applications on your system. - Configure your terminal to use this font:
- iTerm2: Type
p10k configureand answerYeswhen asked whether to install Meslo Nerd Font. Alternatively, open iTerm2 → Preferences → Profiles → Text and set Font toMesloLGS NF. - Apple Terminal: Open Terminal → Preferences → Profiles → Text, click Change under Font
and select
MesloLGS NFfamily. - Hyper: Open Hyper → Edit → Preferences and change the value of
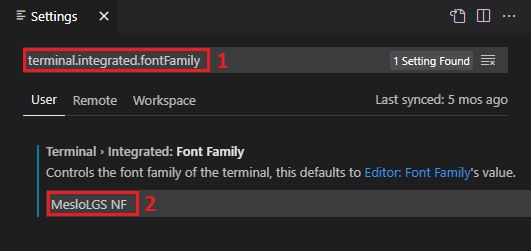
fontFamilyundermodule.exports.configtoMesloLGS NF. - Visual Studio Code: Open File → Preferences → Settings (PC) or
Code → Preferences → Settings (Mac), enter
terminal.integrated.fontFamilyin the search box at the top of Settings tab and set the value below toMesloLGS NF. Consult this screenshot to see how it should look like or see this issue for extra information. - GNOME Terminal (the default Ubuntu terminal): Open Terminal → Preferences and click on the
selected profile under Profiles. Check Custom font under Text Appearance and select
MesloLGS NF Regular. - Konsole: Open Settings → Edit Current Profile → Appearance, click Select Font and select
MesloLGS NF Regular. - Tilix: Open Tilix → Preferences and click on the selected profile under Profiles. Check
Custom font under Text Appearance and select
MesloLGS NF Regular. - Windows Console Host (the old thing): Click the icon in the top left corner, then
Properties → Font and set Font to
MesloLGS NF. - Windows Terminal by Microsoft (the new thing): Open Settings (Ctrl+,), click
either on the selected profile under Profiles or on Defaults, click Appearance and set
Font face to
MesloLGS NF. - IntelliJ (and other IDEs by Jet Brains): Open IDE → Edit → Preferences → Editor →
Color Scheme → Console Font. Select Use console font instead of the default and set the font
name to
MesloLGS NF. - Termux: Type
p10k configureand answerYeswhen asked whether to install Meslo Nerd Font. - Blink: Type
config, go to Appearance, tap Add a new font, tap Open Gallery, select MesloLGS NF.css, tap import and typeexitin the home view to reload the font. - Tabby (formerly Terminus): Open Settings → Appearance and set Font to
MesloLGS NF. - Terminator: Open Preferences using the context menu. Under Profiles select the General
tab (should be selected already), uncheck Use the system fixed width font (if not already)
and select
MesloLGS NF Regular. Exit the Preferences dialog by clicking Close. - Guake: Right Click on an open terminal and open Preferences. Under Appearance
tab, uncheck Use the system fixed width font (if not already) and select
MesloLGS NF Regular. Exit the Preferences dialog by clicking Close. - MobaXterm: Open Settings → Configuration → Terminal → (under Terminal look and feel)
and change Font to
MesloLGS NF. If you have sessions, you need to change the font in each of them through Settings → right click on an individual session → Edit Session → Terminal Settings → Font settings. - Asbrú Connection Manager: Open Preferences → Local Shell Options → Look and Feel, enable
Use these personal options and change Font: under Terminal UI to
MesloLGS NF Regular. To change the font for the remote host connections, go to Preferences → Terminal Options → Look and Feel and change Font: under Terminal UI toMesloLGS NF Regular. - WSLtty: Right click on an open terminal and then on Options. In the Text section, under
Font, click "Select..." and set Font to
MesloLGS NF Regular. - Yakuake: Click ≡ → Manage Profiles → New → Appearance. Click Choose next to the
Font dropdown, select
MesloLGS NFand click OK. Click OK to save the profile. Select the new profile and click Set as Default. - Alacritty: Create or open
~/.config/alacritty/alacritty.tomland add the following section to it:[font.normal] family = "MesloLGS NF" - foot: Create or open
~/.config/foot/foot.iniand add the following section to it:font=MesloLGS NF:size=12 - kitty: Create or open
~/.config/kitty/kitty.confand add the following line to it:
Restart kitty by closing all sessions and opening a new session.font_family MesloLGS NF - puTTY: Set Window → Appearance → Font to
MesloLGS NF. Requires puTTY version >= 0.75. - WezTerm: Create or open
$HOME/.config/wezterm/wezterm.luaand add the following:
If the file already exists, only add the line with the font to the existing return. Also add the first line if it is not already present.local wezterm = require 'wezterm'; return { font = wezterm.font("MesloLGS NF"), } - urxvt: Create or open
~/.Xresourcesand add the following line to it:
You can adjust the font size to your preference. After changing the config runURxvt.font: xft:MesloLGS NF:size=11xrdb ~/.Xresourcesto reload it. The new config is applied to all new terminals. - xterm: Create or open
~/.Xresourcesand add the following line to it:
After changing the config runxterm*faceName: MesloLGS NFxrdb ~/.Xresourcesto reload it. The new config is applied to all new terminals. - Zed: Open
~/.config/zed/settings.jsonand setterminal.font_familyto"MesloLGS NF".{ "terminal": { "font_family": "MesloLGS NF" }, // Other settings. } - Crostini (Linux on Chrome OS): Open
chrome-untrusted://terminal/html/nassh_preferences_editor.html, set Text font family to
'MesloLGS NF'(including the quotes) and Custom CSS (inline text) to the following:
CAVEAT: If you open the normal terminal preferences these settings will be overwritten.@font-face { font-family: "MesloLGS NF"; src: url("https://raw.githubusercontent.com/romkatv/powerlevel10k-media/master/MesloLGS%20NF%20Regular.ttf"); font-weight: normal; font-style: normal; } @font-face { font-family: "MesloLGS NF"; src: url("https://raw.githubusercontent.com/romkatv/powerlevel10k-media/master/MesloLGS%20NF%20Bold.ttf"); font-weight: bold; font-style: normal; } @font-face { font-family: "MesloLGS NF"; src: url("https://raw.githubusercontent.com/romkatv/powerlevel10k-media/master/MesloLGS%20NF%20Italic.ttf"); font-weight: normal; font-style: italic; } @font-face { font-family: "MesloLGS NF"; src: url("https://raw.githubusercontent.com/romkatv/powerlevel10k-media/master/MesloLGS%20NF%20Bold%20Italic.ttf"); font-weight: bold; font-style: italic; }
- iTerm2: Type
- Run
p10k configureto generate a new~/.p10k.zsh. The old config may work incorrectly with the new font.
Using a different terminal and know how to set the font for it? Share your knowledge by sending a PR to expand the list!